

Scrolling through endless racks at your favorite thrift store, you spot that one sweatshirt that nails the perfect blend of nostalgia and bold pop culture attitude. For Millennials and Gen Z, the fun of rocking a graphic crewneck goes beyond comfort—it’s about capturing those throwback moods with just the right amount of irony. This guide reveals how vintage design inspiration and the right fabrics set the stage for truly one-of-a-kind, retro-inspired graphic sweatshirts that keep every look fresh and authentic.
Table of Contents
- Step 1: Gather Essential Materials And Inspiration
- Step 2: Design Retro-Inspired Graphics For Sweatshirts
- Step 3: Prepare Sweatshirts For Custom Printing
- Step 4: Print Graphics Using Preferred Techniques
- Step 5: Check Quality And Finalize Sweatshirt
Quick Summary
| Key Takeaway | Explanation |
|---|---|
| 1. Gather essential materials first | Collect high-quality sweatshirt blanks, graphic design software, and tools to facilitate effective design creation. |
| 2. Design with retro styles in mind | Choose a specific era, focusing on its colors, typography, and motifs to create authentic nostalgic graphics. |
| 3. Prepare sweatshirts properly for printing | Ensure the fabric is clean, smooth, and appropriately treated to enhance the final graphic’s appearance and longevity. |
| 4. Choose suitable printing techniques | Understand the strengths of different printing methods to select one that best captures your design’s qualities. |
| 5. Conduct thorough quality checks | Inspect the final product’s graphic placement, color vibrancy, and overall fabric integrity to maintain high production standards. |
Step 1: Gather Essential Materials and Inspiration
Ready to transform your love for nostalgia into a wearable graphic sweatshirt? This first step is all about collecting the right materials and sparking your creative vision. Before diving into design, you’ll want to curate an inspiring collection of tools and reference points that capture the retro aesthetic you’re dreaming about.
Start by exploring vintage design aesthetics that resonate with your personal style. Dive into old magazines, classic movie posters, or iconic album covers that scream throwback vibes. For the fabric foundation, understanding material quality is crucial. Selecting the right sweatshirt fabric determines your final product’s comfort and durability.
Here are the essential materials you’ll need to kick off your nostalgic graphic sweatshirt project:
- High-quality cotton sweatshirt blanks (preferably ring-spun or organic cotton)
- Graphic design software like Adobe Illustrator or Procreate
- Sharp fabric scissors
- Heat transfer vinyl or screen printing materials
- Inspiration board or digital mood board
- Retro color palette reference
- Graphic design tablet (optional but recommended)
Pro tip: Create a dedicated Pinterest board or physical scrapbook where you collect visual inspiration. The more diverse your reference materials, the more unique your final graphic design will become.
Step 2: Design Retro-Inspired Graphics for Sweatshirts
Now that you’ve gathered your materials, it’s time to dive into the creative process of crafting a nostalgic graphic that captures the essence of a bygone era. Retro design principles are all about evoking emotion and transporting viewers back in time through strategic visual storytelling.
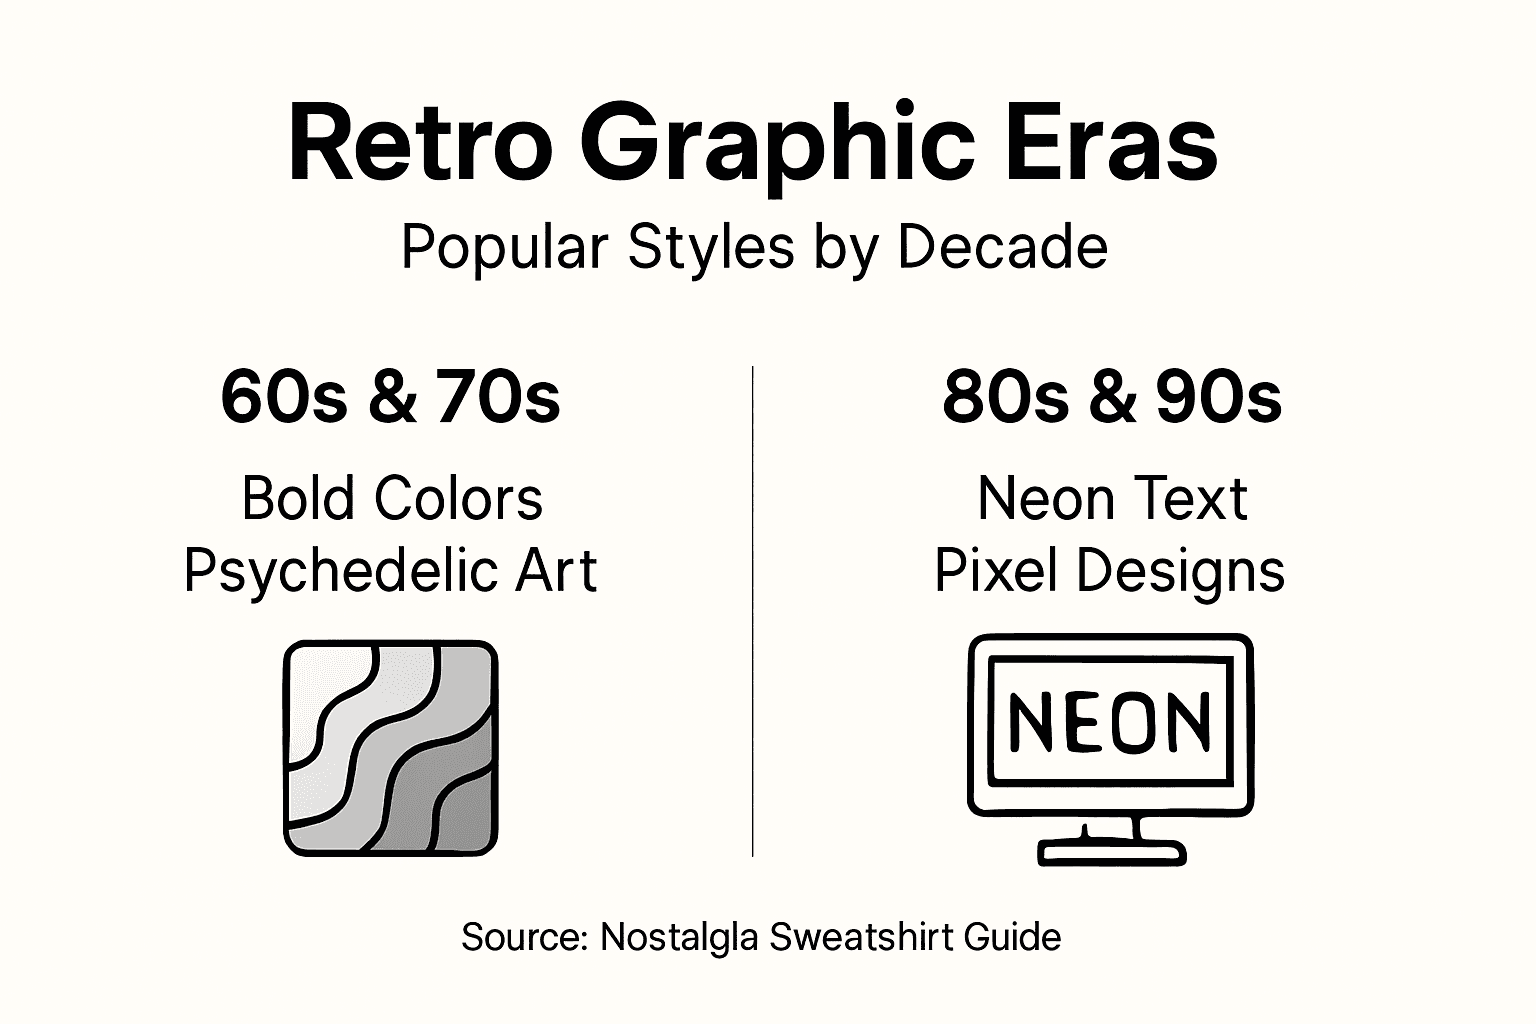
Start by selecting a specific historical era or cultural moment that resonates with your vision. Whether you’re channeling the bold geometric patterns of the 1960s, the neon-infused aesthetics of the 1980s, or the grungy typography of 1990s alternative music scenes, your graphic should tell a story. Pay close attention to the nuanced design elements that define each period:
- Color palette selection reflecting the era’s characteristic tones
- Typography that captures the decade’s graphic design language
- Iconic imagery or symbols representative of the time period
- Intentional texture and distressing techniques
- Geometric shapes and design motifs specific to your chosen era
Authenticity is key: The most compelling retro graphics are those that feel like genuine artifacts from another time.
Explore vintage magazines, album covers, movie posters, and archived design collections to understand the subtle visual languages of different decades. Digital design tools like Adobe Illustrator or Procreate will help you recreate these nostalgic elements with precision.
Pro tip: Experiment with digital texture overlays and vintage color filters to add an authentic aged look to your graphic, making it feel like a cherished piece of memorabilia.
Below is a quick guide to retro design eras for inspiration:
| Era | Typical Colors | Key Motifs |
|---|---|---|
| 1960s | Earth tones, bright | Geometric shapes, florals |
| 1980s | Neon, pastels | Grids, synthwave, chrome |
| 1990s | Grunge, muted brights | Bold type, band graphics |
| 1970s | Warm tones, browns | Psychedelic, disco, stripes |
Step 3: Prepare Sweatshirts for Custom Printing
With your nostalgic design ready, it’s time to transform your creative vision into a wearable masterpiece. Sweatshirt preparation techniques are crucial for ensuring a crisp, professional-looking final product that captures the essence of your retro graphic.
Begin by selecting high-quality sweatshirt blanks that complement your design. The fabric’s color, texture, and material will significantly impact how your graphic appears. Look for smooth, consistent surfaces that provide an ideal canvas for your artwork:
- Surface smoothness for clean graphic transfer
- Fabric color that enhances your design’s color palette
- Material composition compatible with your chosen printing method
- Minimal texture interference with graphic details
- Proper sizing and fit for optimal visual impact
Pro tip: A perfectly prepared sweatshirt is the foundation of an exceptional custom design.
Next, meticulously prepare your blank sweatshirt. Wash and dry the garment to remove any sizing chemicals or manufacturing residues that might interfere with printing. Iron the sweatshirt to create a completely flat surface, ensuring your graphic will transfer smoothly and evenly.
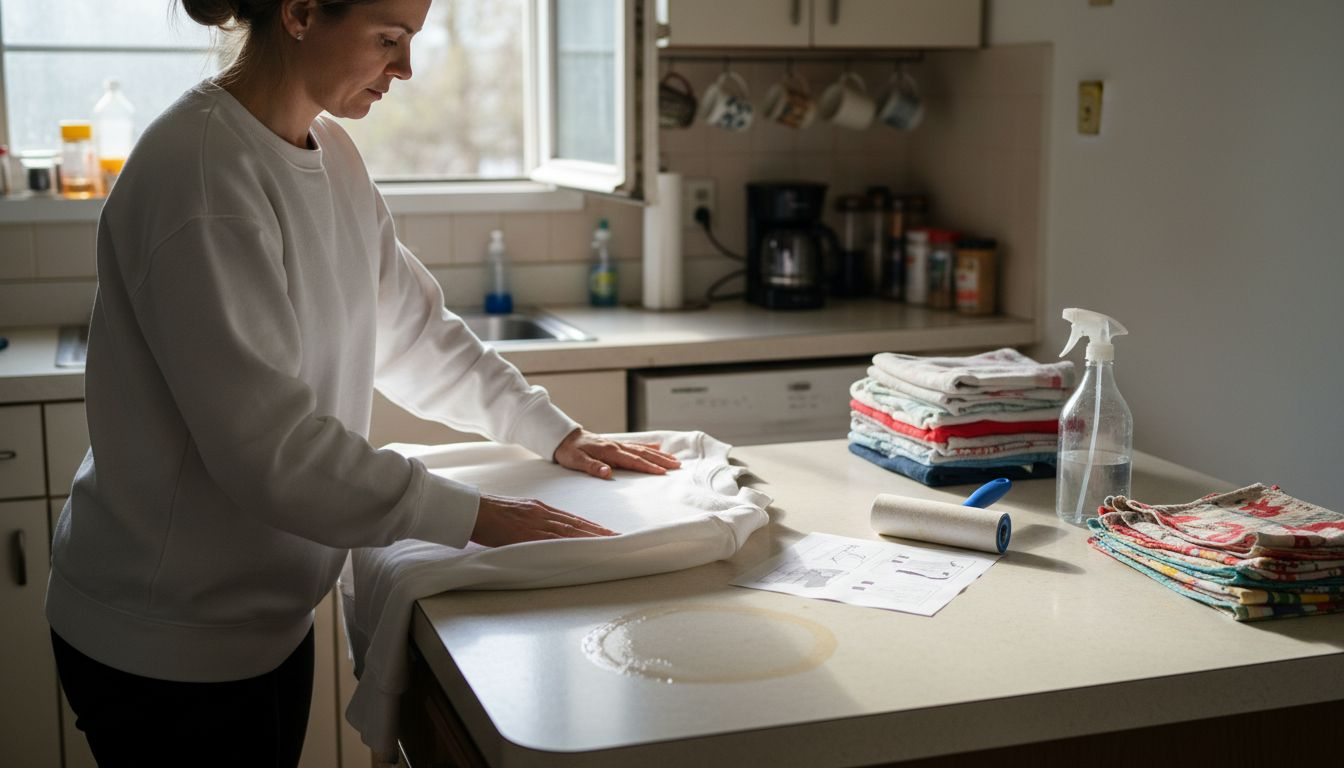
Depending on your printing technique - whether screen printing, heat transfer, or direct-to-garment - you’ll need to take specific preparation steps. Some methods require pre-treatment solutions or special surface preparation to guarantee vibrant, long-lasting results.
Pro tip: Always keep a clean, lint-free surface and use a protective sheet between your graphic and the iron to prevent any unwanted texture or residue transfer.
Step 4: Print Graphics Using Preferred Techniques
With your design and sweatshirt prepped, it’s time to bring your nostalgic vision to life. Direct to Garment printing techniques offer an incredible way to transfer your graphic with stunning precision and vibrant color reproduction.
Choosing the right printing method is crucial for capturing the nuanced details of your retro design. Each technique offers unique advantages that can enhance your graphic’s visual impact:
Here’s a comparison of popular sweatshirt printing methods:
| Printing Method | Visual Quality | Durability Level | Best Use Case |
|---|---|---|---|
| Screen Printing | Bold, vibrant colors | High durability | Large runs, strong designs |
| Direct to Garment | Detailed, multicolor | Moderate durability | Complex graphics, short runs |
| Heat Transfer | Sharp, detailed | Medium durability | One-off prints, photo-realistic art |
| Discharge Printing | Soft, vintage effect | High durability | Faded, authentic retro looks |
| Embroidery | Textured, 3D surface | Excellent durability | Logos, patches, dimensional graphics |
- Screen printing for bold, high-contrast designs
- Direct to Garment (DTG) for intricate multicolor graphics
- Heat transfer for detailed vintage-inspired artwork
- Discharge printing for soft, authentic-looking results
- Embroidery for textured, dimensional graphic elements
Precision matters: Your printing technique can make or break the nostalgic feel of your design.
If you’re using Direct to Garment printing, carefully pre-treat your sweatshirt to ensure the ink adheres perfectly. Load your graphic into the printer, making sure it’s positioned exactly where you want it. Some techniques require specific temperature settings and pressing times, so follow manufacturer instructions carefully.
Pro tip: Always do a test print on a similar fabric scrap to check color accuracy and graphic placement before committing to your final sweatshirt.
Step 5: Check Quality and Finalize Sweatshirt
You’re in the home stretch of creating your perfect nostalgic graphic sweatshirt. Quality control processes are crucial in ensuring your design looks exactly as you imagined.
Carefully inspect every aspect of your finished sweatshirt using a systematic quality check approach:
- Graphic placement accuracy and alignment
- Print color vibrancy and sharpness
- Fabric integrity around printed area
- Seam and stitching quality
- Overall comfort and wearability
- Color fastness and potential bleeding
- Graphic durability under light wear
Attention to detail separates good designs from great ones.
Look closely at your graphic under different lighting conditions. Gently stretch the fabric to ensure the design maintains its integrity. Check for any ink bleeding, uneven edges, or color inconsistencies that might detract from your nostalgic vision.
If you’re planning to create multiple sweatshirts, use this first piece as a benchmark for future production standards. Minor adjustments now can significantly improve your final product’s professional look.
Pro tip: Wash your test sweatshirt inside out on a gentle cycle and air dry to preserve the graphic’s quality and get a true sense of its long-term durability.
Bring Your Nostalgic Graphic Sweatshirt Vision to Life with ChillStitch
Creating a nostalgic graphic sweatshirt can be challenging when it comes to capturing authentic retro design elements and preparing garments that truly reflect your creative vision. This article breaks down the key steps like selecting vintage color palettes, mastering fabric preparation, and choosing the perfect printing technique to make your design stand out. If you find yourself looking for high-quality, vintage-inspired sweatshirts that save you time and deliver lasting comfort, ChillStitch.com is the perfect place to discover beautifully crafted apparel that speaks to your style and story.
Explore our collection and experience clothes that talk back and spark conversations with every wear. At ChillStitch, we blend nostalgia, humor, and heart into each garment made from ethically sourced fabrics designed for comfort and durability. Why wait to create your own statement when you can find it ready-made or draw inspiration from our unique retro designs today? Visit ChillStitch and start wearing your story now.
Frequently Asked Questions
What materials do I need to make a nostalgic graphic sweatshirt?
You’ll need high-quality cotton sweatshirt blanks, graphic design software like Adobe Illustrator, sharp fabric scissors, and heat transfer vinyl or screen printing materials. Gather these essential items to start your project and ensure a successful design.
How can I choose the right retro design for my sweatshirt?
Select a specific historical era or cultural moment that resonates with you, such as the bold patterns of the 1960s or the neon style of the 1980s. Research the color palettes, typography, and motifs typical of that time to create an authentic design.
What is the best way to prepare a sweatshirt for custom printing?
Begin by washing and drying the sweatshirt to remove any chemicals, then iron it to create a flat surface. This ensures that your graphic transfers smoothly and evenly, leading to a more professional-looking final product.
Which printing technique is ideal for capturing detailed graphics on sweatshirts?
Direct to Garment (DTG) printing is excellent for detailed, multicolor graphics, while screen printing is suitable for bold designs. Choose the method that aligns with your graphic’s complexity and desired aesthetic to enhance the final result.
How do I check the quality of my finished sweatshirt design?
Inspect your sweatshirt for graphic placement accuracy, color vibrancy, and fabric integrity after printing. Perform a test wash inside out to ensure the graphic maintains its quality, allowing you to make adjustments as needed before producing more.
Recommended
- Personalizing Graphic Sweatshirts 2025: Step-by-Step Guide – ChillStitchApparel
- How to Create a Retro Graphic Tee for Unique Style – ChillStitchApparel
- How to Style Graphic Hoodies for Unique Retro Outfits – ChillStitchApparel
- 7 Must-Have Nostalgic Tees Every Pop Culture Fan Needs – ChillStitchApparel
- Sweaters and Sweatshirts for Women - What to Wear and How to Style Them – Be Juliet